A flat bag is one with a front panel, a back panel, and no gussets
or additional folds.
Xbag™ is easily applicable to side-welded
flat bags. In this process the bags travel sideways during the making
process (this mode converts either a slit- or split-tube into either
one or two rows of individual bags; not all flat bags are made this
way, but most are). Adaptation for Xbag™ is simple.
 At
right: Plan view of process for making SNAP™ flat bags of side-weld
type. (Numbers are for clear reference in written communications.)
Punches are a simple way to create reveals. Punches
need not be circular, in
fact
a rounded
rectangle
might be
preferable
-- and
very stretchy plastics might benefit from longer reveals.
The layout shown is a typical one. Here is a conventional
process for side-weld bags, to which top-layer and bottom-layer punches
have been added. The punches are offset from each other by one bag
width.
In this example
they are operated simultaneously each second advance; meanwhile,
on each advance two welds and a cut (or perforation) are made.
Of course, the front panels are guided between the jaws of one punch
and the rear panels are quided between the jaws of the other.
Alternatively, punches could be together and not offset,
but then they would have to operate alternately, one punch with each
first
advance, the other for each second advance (don't punch the top and
bottom layer reveals in the same place, or the SNAP™ feature
would be defeated).
Advancing and punching: the folded sheet is advanced as usual one
bag at a time for welding and cutting, but on one advance the front
sheet is punched (overlapping where the welds and cuts will be) and
on the next the rear sheet is punched. Alternatively, a pair of punches,
one for the front sheet and one for the back, can be arranged one
bag width apart and operated simultaneously on each second advance.
The bag should also have indicator grip holes™ (described
below) which
show the user the places to grip to open the bag. If these are punched
first, they could then used (via a light sensor, etc.) to cue
the punches for the reveals (706, 707).
Conventionally, a large flat bag 700 is formed from
a U-shaped panel, or a flattened slit tube, from which bag sides
are formed by welds
704 and bags separated by cuts 705. To make SNAP™ bags alternating
reveals or weakenings are made in the free edge of the slit tube
stock. A reveal 706 in the front panel is complementary to the
reveal 707 in the rear panel; grasping the bag in these areas permits
shearing
of front and rear panels against each other thus disrupting interlayer
cling and rendering the bag readily openable.
At right is a perspective view of process for making SNAP™ flat
bags of side-weld type.
In the perspective visualisation three bags (labelled 1,2,3) are shown in the process of punching. Sealing
and cutting complete the bag following punching, and then folding
and packaging can be done as normal.
The bags could also be made from multiple strips of a
wide tube, in which case the bag bottom is also a weld, but the side welds would
be the last ones made.
Although bags commonly are detached from each other at this point,
they can also be put on rolls; the bags will be connected side-to-side
and the openings will be along one edge of the roll (see below).
The SNAP™ improvement can be made with a simple addition to
existing process lines: a pair of punches, or any device to make
a localised void or weakening in a single layer.
These bags are easy to make with small change to standard slit-
or split-tube manufacturing lines.
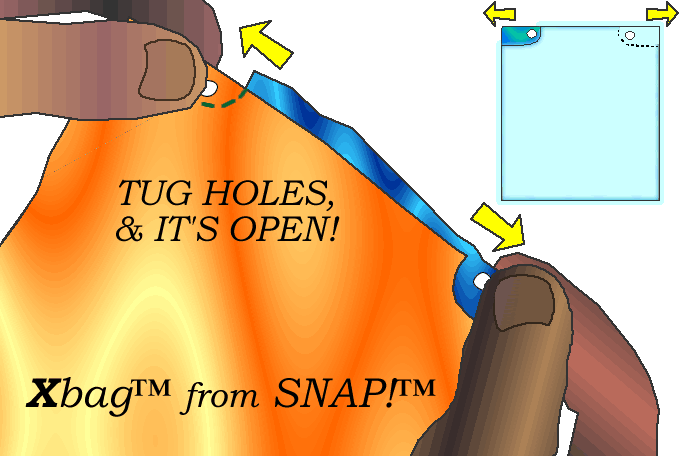
The procedure creates a bag in which reveals expose
graspable points, each addressing one sidewall. That allows
the user to grasp at the inner end of the reveals created by the
punches (in a large bag such as for refuse or laundry this would
usually be about half to one thumb length or 3 to 5 cm in from
each side) and tug
lightly within the plane of the bag. This small but highly efficient
motion instantly shears the front and back panels against each
other and disrupts the interlayer cling over the entire width of
the bag top.
"How
does it work"? Purely mechanically, via the special architecture.
The Xbag™ has alternating (one at left front,
one at right rear, etc.) reveals or weakenings near the top
edges. The grip holes™ show top-of-bag and where-to-grip.
That lets you grip the front and back independently and, with a
light tug, shear them against one another for the entire distance
between the grasping points; this breaks the interlayer cling and
the bag is open.
Shown [at right]
in cross section (red) of top of bag: "grasping points" are
where you can grip just one panel, and there's one for the
front
and one for the back, so a light tug pulls them in opposite
directions, opening the bag. They work like the "edge
strips™" of a Zbag. On an Xbag™, "grip
holes"™ (see
photos and diagrams on the main Xbag™ page) show
where to grip (where grasping points are), and show which end
is top.
We recommend
that Licensees punch grip holes™ in
the portions exposed by the reveals (#706, 707 etc. in the plan view
diagram, and shown in the drawing below), as an indication to the
user of where to grip and tug. (These
indicia are a trademark and Licensees can exploit them in advertising
or promotion, to increase both customer comfort and product recognition.)
The grip holes™ enable a humourous
and catchy identification of the bag: "the bag with the holes in it"™.
A note on the package of un-printed
bags (if bags are to be printed, include this graphic) would include
this graphic:
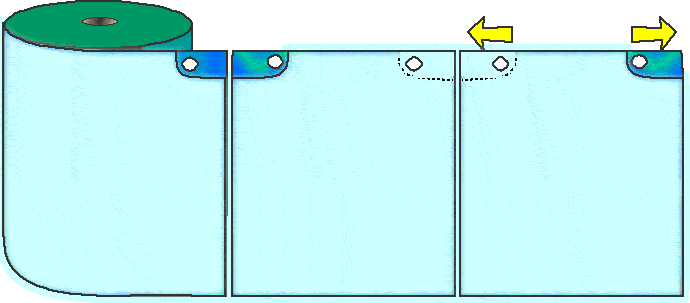
ROLL
BAGS WITH MOUTH ORIENTED SIDEWAYS. back
to top
Supermarkets in North America traditionally have liked flat bags
on rolls. Up to now however, these have been prone to difficulty
(intermittent to regular depending on brand and user) in opening.
Roll flat bags as most commonly seen are connected end-to-end. This
is clearly not a requirement, as can be seen from the fact that large
flat bags are often made FROM a folded sheet and (before cutting)
the 'imaginary' bags-to-be are joined side-to-side. Flat bags can
therefore be made in a side-to-side series, with the mouths at the
side of the roll. Instead of cutting, you perforate. This allows Xbags to
be used, to bring ease-of-use to flat produce bags and other flat
bags commonly supplied on rolls.
 |
Xbags can be single (as normal for
many flat bags), BUT can also be issued on rolls/PTO (PerforatedTearOff).
Roll bags with side-to-side arrangement.
One-handed use sequence: (A) "pinch and tug" separates
front and back, and (B) "grip and rip" detaches bag from series.
Alternatively: tear off bag, grip both reveals (left and right)
and tug lightly to shear front vs back and disrupt the interlayer cling.

|
Labelled graphic for Xbags on roll:

back to top